Showing posts with label terrain. Show all posts

4/21/20

Throw back Tuesday- Bane Blade terrain piece


Blasted from the Past


I found this picture while digging through some old boxes. Back in the early 90's I managed to score some mis casts from my friend Tim DuPertuis, owner of Armor Cast. I think I traded him some of the Bunkers I made for them.

I made 4 terrain pieces from the bits I got. A bunker made out of a Reaver Titan carapace, a reaver arm in a crater,  a reaver gun with some built up area, and this knocked out Ginormous baneblade tank. 

We used to game at our local game store, Gamescape, and I had all of these pieces in the display case there.  One day I got a call from Dianna, the store manager. Robin Williams had come into the store and liked all my pieces and wanted to buy them!  I had met Robin a few times previous to this, as we both lived in the Castro district at the time. By now, he had bought his house in the Sea Cliff area (a really cool, yet posh part of San Francisco).

After talking a bit, We settled on a price and picked them up. Later, Robin commissioned me to paint up a set of commissars for him, which I delivered to his house. I got to see some of his eldar collection, which was vast!

I hope that Robin had fun playing with these pieces. I'm not sure what happened to them. Someone on FB said that his daughter Zelda was posting pics of his toys and asking questions about what they were, so maybe they will pop back up.


11/27/18

Lightbox Backdrops

Lightbox backdrop prototype


 I've had several queries about my Lightbox backdrop and figure display stand, so I thought I'd do a bit of a write up and show the "behind the scenes" of it all.

Origin Story

So a while back I laser cut some buildings for my 54mm Imaginations woodens based upon some designs that my pal and erstwhile partner in crime Jaye Wiley designed. They all fit together to make a hollow "town" as a terrain piece. Looked like this.
Town in use, with entry gate. Invading army sold separately.

Erm, I never quite got them finished in time for the battle...

These worked like a charm,telling both the story needed and, being hollow, a way to hold the troops who captured the town.  During packing up after the game I dropped it and, as I only had it lightly glued together ( it was still a WIP painting wise...) it came apart. No biggie, I was going to take it apart anyways.  I packed them away until the next battle.


Ideation Time

 On the drive back from the convention, I had a thought. These sections reminded me of stage flats.I need to take some pictures of troops, wonder what they would look like as a background? 
Basic building cut outs, with a stain and some grey on the stacks
So, I laser cut a base of cobble stones using crafting foam and glued it onto a piece of 3mm ply. this piece had slots for me to glue some triangle supports to hold the backdrop of buildings up.  The size of the backdrop is made to fit in my small lightbox that I bought off of ebay for $20.

Back view, kinda cobbled together.
Once I had it all in place, I started painting the stage front, taking a few pictures along the way. The flat was... too flat, so I added some depth to it by layering frontages, window frames, barrels and a sidewalk.

Early stages shot with little layering and WIP paint

side view showing"layering"
While doing this I experimented with various window treatments, from just etched lines to etched in windows to fully cut out. The best technique turned out the be etched lines, which is actually the easiest.  Once finished I just pop it back in my light box, with the sky backdrop showing through.  

Cobblestone street is 2mm hobby foam. I like the texture and it paints up well

This shot has an extra side building as a test.

What Next?

Like I said, I've had a lot of questions on how I built this, and a few folks wanting to commission me for one (I'm booked solid till next year).  My next steps are to design a backdrop that assembles easy with slots, possibly easy to take apart for travel and storage. I've also been drawing up some new building types, as well as a "scary woods" and a dungeon backdrop.  All fun stuff! 

Depending on how things go, I might just present this as a small Kickstarter mid next year.  If you have any basic terrain skills of your own, this kind of thing could easily be made out of foam core and balsa.

I'd love to hear feedback from you. What size would be good for you? What style(s)?

Cheers!


3/31/18

Happy Easter from Skull and Crown


Wishing all of you out in bloggy land a very happy Easter and other spring like festivities!

2/23/18

More Light Box Backdrops

Captain Terror and Guido Veloce race across the wastelands

Light them up!

You'll have to indulge me as I am on a bit of a binge. I've discovered that painting back drops is easier for me that 10mm Roman shield patterns, so I've diverged a bit.  Actually I'm really having a blast doing these and it puts my BFA to good use.
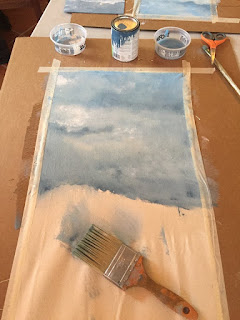
Stage 1. Canvas, a big brush and some wet paint

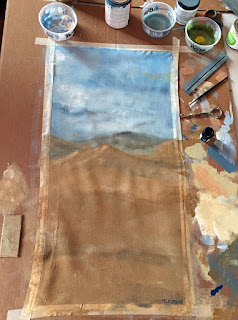
Stage 2. adding in the land.
This particular back drop is for a face book friend and fellow designer. He does 3d stuff, so at some point I'll Rumpelstiltskin him for a project that I can't do. I love bartering!

Stage 3. Drybrush and add highlights. Fossling sold separately
The trick to getting these solid is big brushes and making sure the land section is painted up high enough on the material so that when you curve it, you get the right amount of land and sky.  Pretty happy how this came out, and I did one for me at the same time.

City Stuff

All the light box is a stage!

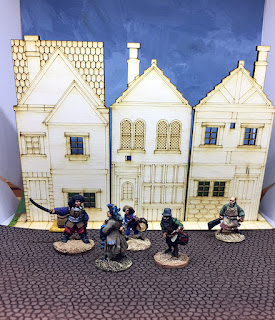
Another idea I have for light box backdrops is actually building a "stage" set.  Here's the start. The buildings were originally designed by the talented and handsomely rakish Jaye Wiley of Wiley designs ( Jay is my artist who does all my flags and cool add artwork!)

I've taken his original designs and started changing them up for scale, and layering. This is the first round of test shots.  Now that I look at them, I want to get a bit more depth to the set, but not full on 3D.
The Rum Thief, dress rehearsal.
For this backdrop, the cobblestone road is made of craft foam. I may just go back to an MDF for this though, as the floor is more floppy than I want. It does have a grand texture though, so I'll paint it up along with the buildings and take another shot.

Right- that's all I have for now. I'm thinking of doing an article for one of the gaming mags on backdrops. What do you esteemed readers think?

Cheers


2/20/18

Light Box and Backdrops

Landsknechts show off their mortar in the rolling hills of Italy.


Light Box and Backdrops: Backstage Pass

So I got a new small light box, which so far has been totally worth the $19 I paid for it. It came with  black and white "craft foam" back drops, but I wanted to see if I could build out more for my worlds. having made several backdrops for my other shots, I thought I'd give it a shot.
lightbox exterior. You can see the LED strip and boundary edges


I took another piece of craft foam and hit it with the paint. The trick to making these types of backdrops is fast and loose.  I paint down the sky first then bring the terrain up to match, using the same colors of paint I use for my bases and gaming mats. Then, like basing, I added course pumice gel with paint mixed for some texture on the foreground, and dry brushed it with cadmium yellow after it dried. 

Backdrop Materials- what works?

This is something I keep experimenting with, and am finding different results based upon the needs and requirements. Here's a few thoughts.

Support stand not included...

All paint here is done like watercolors.

Paper:  Paper, especially a quality paper like Rives BFK  comes in large sizes ( 30x 40 inches)  and costs under $10 per sheet. It's thick quality rag paper made to be rolled up and painted upon. I use this to make my larger backdrops that can be taken to conventions, and is great as the "hold it up" for any game shots.

Canvas:  Only slightly more expensive, canvas is also designed to be painted upon. This is what I use for my game mats, so the idea just translates to canvas very easily. Canvas can be rolled, folded, stuffed, etc and is very travel friendly. It is less stiff than paper, so needs to be supported when taking the shot. The nice part about canvas is that you can let it "roll down to make a smooth transition from sky to ground. Kind of the whole set up instead of just a backdrop.
Wasteland terrain backdrop that matches my game mat.
Canvas impromptu photoshoot.
  I actually like that you can see the texture of the canvas in some of the close up shots. It gives it a neat look.; not realistic, but painterly.


Foam:  Craft foam is cheap ($1 per sheet)  comes in a bajillion colors and is super easy to cut. I've found that it takes paint very well, although check the texture. I've gotten a slightly porous foam which is great for painting, and a smooth foam which is more resistant- or at least can leave brush strokes more readily.
Foam sheet textured and painted for the light box
Like the canvas it bends easily and can be transported. This is what I am currently using for my new light box. The limiting issue with craft foam is size, which standardizes in 12" x 18". Great for the single figure, but can be a challenge shooting units.


 Right- that's all for now. I am actually in the process of making more backdrops, including some "stage sets" to go with them. more soon.

In the mean time, I'd love to know what you do for backdrops, or have any suggestions on what more you'd like to see.

Cheers!


12/10/17

Beauty is in the 11 Eyes


...And the DM said unto them," Be not afraid; for behold, I bring you good tidings of great...Roll for initiative!

Beholder Tree Topper

So, each year we have a big Christmas party, and the Mrs. picks a theme for the tree. This year it was the 25th anniversary of the party, so the theme was silver, which then went to blue and some red... because reasons (did I mention I don't get to pick the theme..)

Anyways, we get the tree into the house and the first thing my daughter asks is," do we have any big googly eyes"- which of course we do, and she proceeds to put them on the tree, proclaiming it a mimic.

And, things kind of went downhill from there. When asked to make this years tree topper, I knew where we were heading.

Beholder: One day build


That's no moon! a 5ish inch foam ball for the base

This build is pretty easy, actually. Armed with my Volo's Guide to Monsters, monster manual and the internets I chose an image that I felt I could achieve pretty well- a classic not too fancy beholder. Having made sculpts like this before where you have to get to a lot of spots with wet clay, the first thing I did was make a stand out of some scrap wood and a dowel. This was, as I later learned, key to actually making this project a success.
punch mouth!

Once I drilled a hole in the ball for the base, eventually the tree stand, I drew in the mouth and main eye, then poked holes and added pipe cleaner eye stalks. In retrospect and if I had more time to shop for materials, I would have used a stiffer sculptors wire.

Cracking toast- Grommit!

  after covering the entire body with a thin 2-3mm layer of Crayola air dry clay, I worked from the eye down to the mouth, then added in mat board teeth. Then I did the eyestalks, and finally adding bits of detail in the way of horns and some armor bits.

Honey! the meatloaf is ready...

I was on a 3 hour deadline as the Mrs was going full bore baking literally 100's of cookies and a few cakes for the party. I had to get this guy into an oven set to 100 degrees over night to speed up the air dry clay.

I could have kept painting, but remember this is going on top of a tree..


The next morning, smiley was dry and ready to be painted. There were some cracks in the eyestalks that I tried cleaning up a bit with liquid green stuff, (see above, should have used wire) and some happy accident cracks all around the body that looks like armor.


I painted him(?) up with a mix of Plakka red and the standard slew of minis paints. All told about an hour to paint up.

I'm on Top of the World! 


That's no tree- it's a mimic!
The prettiest angel!


Done and done, the beholder weighed in at just over a pound, and fit well atop the tree. This was a great one day project that took roughly 4 hours to build. It really helped that I was familiar with the materials and had a good plan, and stand.

Now, what else to do with this after Xmas???


Cheers and cool Yule to all!
Ths


7/15/17

My name is Skull and Crown and I play with 6mm sci fi

Steve Jackson Ogre MkIII and some forge world tank busters.

Coming out of the Closet

It's true. For several years now I've been collecting and painting 6mm sci fi. Tanks, Mechs, Ogres (or as I like to think of them, BOLO's) troops, robots, Titans- the whole shebang! My close friends have known for years, and have supported me throughout tough times, like the Ogre kickstarter, and have tolerated my 6mm napoleonics.
 Now I'm ready to admit it publicly, and embrace- nay- be proud of my wee ways.

But in order to come out, I needed to have  platform upon which to do it. 

Offworlding

I was keen on making a new "planet" inspired by Venus and Mars and well, any good sci fi movie. Part of the plan was to incorporate all the vaccuform craters I've been hording over the years. I know I wanted an orange look, but not too orange. The main choice of color would rest on what paints were available at the local Home Depot and ACE Hardware off color bins.

I scored a  gallon of  deck paint with sand already in it, tannish color for $8, a quart of red brown for $4, and a  pint of yellow for $2. I already had a sampler pint of orange and a gallon of "Vallejo flat earth" that I had custom made last year as my base color (I use it as the base for all my mats no matter what terrrain, so my bases can match). 
One stretched canvas later,  some foam cut hills, and  a few layers of paint and drybrushing, a decent enough planet was made. 

under painting of the Vallejo brown. This is really a stain on a very wet canvas
The done mat- in the shade, so the colors here are muted. 

This picture captures the true color of the planet. Hm.. I need a name....
Troops in review

Infantry use the leviathan for a screen, and take advantage of it's shields

cute light jeeps scout ahead and worry about their cammo choices...


As my Combat! rules allow for Bolos, or Leviathans as I call them, the classic Ogre model fits the bill. I swear the lines on the Steve Jackson Ogre are as iconic as a 62 Chrysler 300.

Heavy Gear Mechs are swarmed by Skyth bugs


These pics cover just some of the collection, set up for a test photo shoot. As you can see, I'm all over the place with manufacturers. One company who's minis I am keen on is  the Dark Realm Miniatures line from Microworld games. They are actually quite pricey for 6's, but I love the sculpts.

Right, now that that's out of the bag, time to actually get these rules penned up.


4/24/16

Field of Dreams

                               "If you build it, it will be ready for the con"...
                                                    ~ Everyone that's asked me to do a commission...


 Back in the day I used to do a lot of terrain commission work, but with everything going on for Skull and Crown, such things are more of a challenge. Still I have some patrons that are very patient. I was handed this commission last year with a, "pretty please!". Happy to say I've finally gotten it done and ready for the upcoming convention.

Combo Field

for this commission I was handed a bit of resin cast wall, and some cut foot step rug. The challenge was to make a field of x size with a gate and removable "crops" so that as the troops moved through the field the pieces could be removed. 
Built up walls. the plow field is actually the soft sheet foam, scored

 After figuring what size we needed, I laser cut a base, and cut up the wall pieces and fitted them around, and made more wall out of Epoxy putty.  The plowed field is a sheet of 2mm soft sheet foam that you can buy in most all arts and craft stores, which I scored with a pencil in rough furrows and then glued in place. After, I used Golden's coarse pumice gel mixed with flat earth and filled in all spaces where dirt ought to be.

Top down, field  ploughed
Top down field with wheat. Corn fields are also an option for AWI games
After every thing was dry, I painted up the rock walls, did a series of washes and dry brushes on the field to give it a more "rich soil" look and added some flocking and bushes.

RAF pilot is rescued by 2nd armor.
Lastly, I made a gate out of wood, with a base, so it can be opened and closed. Looking forward to seeing this on the game tables at Kublacon in a month- I'll try to get pictures of it in "action"

Cheers