Showing posts with label 28mm. Show all posts

9/11/21

Grimy Green Ghostly Skeleton Revenants


Kevin Dallimore wrote this fine article on a variant of painting undead Revanants for Oathmark, and I wanted to try it out on my Triumph of Death skeletons. 


The basic gist is to paint up the minis quickly (but cleanly) using shades of grey, and a mix of gold and silver for the metals. Then liberally apply washes of Army painter greentone quick shade. 


I kept laying on glazes, but then found my self wiping parts off. I then just went for it and I think after a total of 4 glazes called it good. 

This shot is a great side by side of how I normally paint my skellies. All in all I really like the technique and it does go quite quickly. I'll end up doing a full unit of them, maybe a few. 


7/17/21

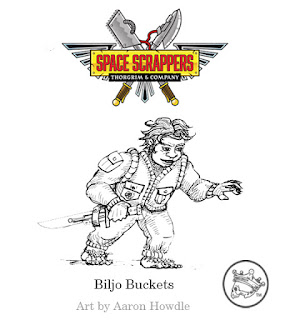
Biljo Buckets


Biljo Buckets was a janitor on an Imperial Heavy Cruiser. As a Halfling he could dodge most everyone (and his job) on the ship, often ducking into small places or travelling through air ducts. Most of this exploration also involved petty theft, mostly in the form of food from the galley. During one of these adventures Biljo  fell into a sanitation reclamator, almost killing him- but as he scrambled out he saw something shiny on a ground a ring- a famed Jockero ring. This particular ring was not outfitted as a weapon, but instead creates a chameleon like field around the wearer, rendering Biljo almost invisible.

One day Biljo saw servitors loading supplies and food onto an attached Rogue Trader ship- he snuck on, and fell asleep, only to wake up with an angry looking dwarf standing above him. After some parlaying, Biljo has signed on to Thorgrim’s company as the official burglar and scout

6/30/21

Space Scrappers: New Greens, Concepts and 3 days left on the Kickstarter!

 Ahoy all! 

With 3 days left on the Space Scrappers Kickstarter   and just a few backers shy of the next stretch goal unlock I wanted to share some concept art and the new greens that Drew has finished up. 

Stretch Goal Concepts


First the Orkling King- our next stretch goal. He comes with a scenario. 

Greens so Green


Thanks for taking a gander- and don't forget to check out the Kickstarter! 


6/22/21

Space Scrappers: New Blasters and Clearers


I got some master casts for review of the blasters and clearers, and could not wait to paint them up! 

Space Scrappers Kickstarter has 10 days left- and has 3 stretch goals unlocked, with another on the horizon. Come join the adventure! 

https://www.kickstarter.com/projects/skullandcrown/thorngrim-and-company-space-scrappers?ref=user_menu


6/14/21

Space Scrappers 24 hour deal

 Ahoy! 

It's 24 hours before launching my Space Scrappers Kickstarter, and I want to let you in on the 24 hour deal I am having. 


This is a limited edition mini- so if you want it make sure to jump in on the pledge! 

Here's a reminder link for the kickstarter that will remind you when we go live

Space Scrappers link 


Scale comparisons 

How tall is your dwarf? Here are two scale comparison shots with some old school GW rogue trader era minis. 


Cheers! 


6/9/21

Space Scrappers: Kickstarter launches on June 15


My Space Scrappers Kickstarter is ready, and will launch in a week. Always looking for more in the Adventure party!  

sign up here , and I'll notify you when it launches! 


5/25/21

Space Scrappers: G4NDF


G4NDF

Astrographer cyborg G4NDF accompanies Thorngrim and Company on their adventures, acting as astro-navigator and advisor. His wealth of knowledge can identify arcane and ancient technologies, and more importantly, who will pay the highest price.  


 I received some first casts for review this week, and could not wait to put paint on some of them. G4NDF is done up in classic color scheme. Drew Day Williams did a bang up job on the sculpt, and it's really a treat to paint.


I'll admit I may have watched 2 hours or more on how to paint a power weapon on the YouTubes... I still need more brush time on those, but not bad for a first try.


5/13/21

Space Scrappers: Finders Greens


Philly and Kily are the youngest of Thorngrim’s Company, which makes them perfect for the role of Finders. With their trusty “Bill” P0-NE they scout out ancient treasures and technology. Greens for my upcoming “Space Scrappers” Kickstarter 

https://www.facebook.com/skullandcrown


5/8/21

Space Scrappers: Hero Greens


Drew has been busy closing in on all the master sculpts, aka "greens" for my upcoming Kickstarter. Here are some of the heroes of the adventure party. 


5/1/21

Space Scrappers: First Greens


Here are the first greens finished for my upcoming Space Scrappers Adventure party. Drew is really capturing the old school vibe, and the level of detail.


3/22/21

Space Scrappers: Bijo Buckets


Biljo Buckets

Biljo Buckets was a janitor on an Imperial Heavy Cruiser. As a Halfling he could dodge most everyone (and his job) on the ship, often ducking into small places or travelling through air ducts. Most of this exploration also involved petty theft, mostly in the form of food from the galley. During one of these adventures Biljo  fell into a sanitation reclamator, almost killing him- but as he scrambled out he saw something shiny on a ground a ring- a famed Jockero ring. This particular ring was not outfitted as a weapon, but instead creates a chameleon like field around the wearer, rendering Biljo almost invisible.

One day Biljo saw servitors loading supplies and food onto an attached Rogue Trader ship- he snuck on, and fell asleep, only to wake up with an angry looking dwarf standing above him. After some parlaying, Biljo has signed on to Thorgrim’s company as the official burglar and scout.

2/18/20

White company: Sir Nigel Loring


I've just finished reading the White Company, by Sir Arthur Conan Doyle. Can't believe I never read it as a kid, and happy to consume it now!


 In honor of the story, and because I have some beautiful minis from Claymore Castings, I'm going to (slowly) do up a unit or three of the White Company. Not so much the historical unit, but the fictional characters in the book. Here's my first stand, with Sir Nigel Loring, one of the Leaders of the group that travels to France while Sir John Hawkwood, the main commander of the White Company is off with his part of the mercenary force in Italy.


The standard bearer is riding a Perry miniatures plastic horse. 

Lorings Arms are 5 roses on a field of white. I've been schooled since I made this that the swallow tail pennon was more French than English, so I may have to redo the banner.
Now, to order some more English Longbow!


10/24/19

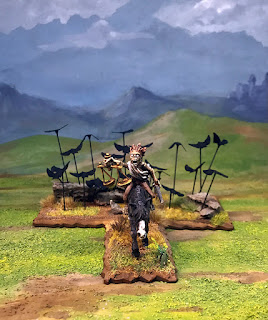
Bats! A tutorial


Going Batty for Bats! 

So, a few years ago I was walking by a stationary store during October and saw this cool confetti in the window. Lightbulb! I had an idea.  Bat swarms!

Over the years I've made these for different games, friends and family, etc. Thought it was time to do a tutorial.  This tutorial goes over all the basics I've learned (some the hard way) and how I based this particular unit, for Kings of War.

Parts is Parts

The bat swarm is made up of three parts: bat confetti, insect mounting pins, and super glue gel.
Bats- found on Amazon, but check your local shops first

Bat Confetti:  These plastic bats are a great size for 28mm "Vampire" style bats. A bag of a bajillion of them costs from $1.99- $3.  Not only are they a good shape, the plastic bends well into animated poses.


Insect Mounting Pins

Caution- very sharp! 

Over the years I've used various methods to make "stands" for my bats, from larger straight pins to styrene rod. I think these insect pins are the best as they are the thinnest thing I could find, and are quite strong.  They come in different heights and sizes, but the size 2 pins which are 60mm tall I think do the trick.  Cost is about $7.00, but you get a 100 pins.  In my example I have about 23 bats on my base, so that's a total cost of $10.00-ish for  4-5 units worth of swarms!  Here's a link to the pins on Amazon


Super Gluin-it Right!

I'm all over the place with glues, but I've been liking the Gorilla Glues lately.  I do reccomend gel glues over regular so that the bats "stick" better.  Also I'm showing the pin vise I use to drill holes into the base.


Assembly 

This part is both easy and tricky.  Your first thought, as was mine, was dip the tip of the pin in glue, stick it to a bat, and done!  The trick here is the glue takes a bit of time to set, and the bats slide off and glue themselved to your table or fingers or pants (yeah, I found one) instead. Here's the trick I learned.

I use postit notes to put the glue on. Then roll the pin head to get a good "gob" of glue.


After putting glue onto the pin, stick the pin in something. I had a cardboard box close by, so used it.
Then, take a bat and balance it on the pin and let the glue do it's work.  Make sure to space them far enough apart as you are doing this so that you don't bump the other bats.  Let them dry for a good hour before mounting- which gives us time to do the base.

Bats on a stick!


All your Base!

 I'm basing this unit for Kings of War. In the forces of the Abyss army list you can have flying imps, so these could be statted like that. Honestly these could be considered fast cave of any type- it's really up to you! Back to basing. I started with one of my "troop" size Kings of War bases that I make, and trim the sides down with a box cutter blade, creating a bevel, which helps blend it into the terrain.
MDF KoW base

Always cut away from you!!!


I want some height variation to help the bat swarm look, swarmy... so added some cork to the base. they I spread glue on and added flocking sand. It was a hot day, so I put it outside for about 15 minutes and it was all dry.
Cork is cool stuff! (and easy to mount pins in) 

base covered in sand. I need to get more!
After it was dry, I gave it a base coat of Vallejo flat earth, and some dark grey(Foundry Stoneb 57b) on the cork to make them into rocks, and drybrushed with light earth and a bit of P3 menoth white base and grey  to lighten everything up a bit and grab details. Use whatever colors best work for you.


Add water to the mix. you have a lot to cover! 

Good enoufh as this will be flocked as well.

Once the paint was dry, I glued some flocking and some bushed on (but forgot to take a picture of that). I did this before mounting the bats so I would not get glue and grass accidently on the pins.

Pinning and mounting 

To make a good swarm, you will want to vary the heights of the bats. To do that you will need wire cutters to clip the pins. CAUTION  this is an important thing I've learned in doing this. Those tiny needle sharp off cuts will go flying and you will find them the hard way sometime later. I got one stuck really deeply in my foot. Here's the trick Tape! Befor cutting, place the pin on the sticky side of a piece of masking tape. When you clip it, the off cut stays on the tape.  I cut about half my bats pins, some really low, some mid ish. Play around and do what feels good.
Sticky side up! 

One piece of tape goes far- and is easily disposed of. 
Once cut, I started from the center of my base and worked my way out. drilling small holes and gluing the bats in. Before gluing, I bent the wings by gently pinching them with my fingers. Note that some of the bats, if not well glued, will pop off. I Made extras just in case, and re-glued the others on for future basing.  The cork works out great to give extra height to the overall look, and is easy to stick pins in.
nearly finished! 

Don't be afraid to play around- add more bats, bend wings, angle pins for movement
Top down. Note no bat goes past the base edge. 

Side view- this shows how I was trying to get them to swoop down.


Touching up! 

Once all together I play around with some of the wings, and see if I need to add more or less bats to create a flow. The plastic bats are very shiny plastic, but dull down perfectly once you seal the whole thing with a matte spray.  One thing I did do before I sealed the bats, was to go in with some dark brown and "gesture" the bodies, heads and wing frames. Nothing fancy and very "loose" painting, just enough to break up the shapes a bit. When I varnished the unit, the brown kinda got lost, so I'm going to go back and hit it again I think. I may also try a bit of grey.

Done! 

This entire project took about 2 hours, including waiting for paint to dry.  I'll be making more swarms, and using a few bats to dress up bases for my Triumph of Death undead.  I hope this was helpful, and I look forward to seeing your bat swarms.  Here's more pictures next to miniatures for scale.

Cheers!
Ths